Before you start: You must create zones first. Rates are based on zone-to-zone pricing.
How to create and manage zones
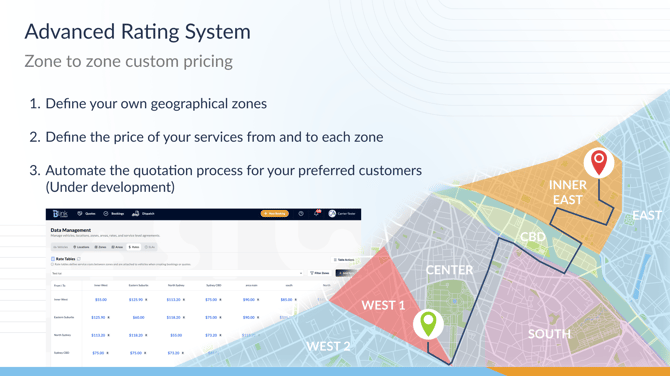
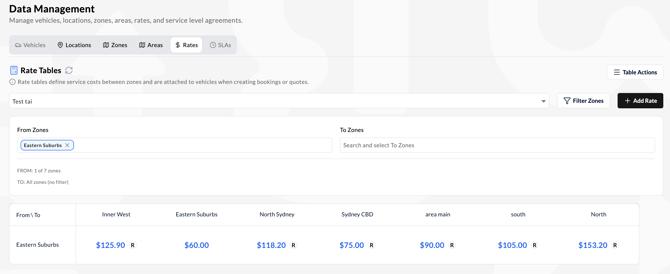
What Rate Tables Do
Rate tables store your pricing for different routes. In the future, these rates will automatically populate when you create bookings or quotes, saving you from entering prices manually each time.
Two Ways to Add Rates
Manual entry: Add rates one at a time through the interface
CSV import: Create rates in a spreadsheet and import them all at once
Use manual entry for a few rates. Use CSV import if you have many rates or already maintain pricing in spreadsheets.
Manual Entry
- Go to Data > Rates
- Click Add Rate
- Select From Zone and To Zone
- Click + Add Service and enter:
- Service name (e.g. "Movement", "Tolls")
- Price in dollars
- Add more services if needed (the total updates automatically)
- Tick Reciprocal rate if the same price applies in both directions
- Add notes if needed (optional)
- Click Create Rate
About Reciprocal Rates
When you tick "Reciprocal rate", the same price applies for both directions. For example, if you set Sydney CBD to Inner West at $75, Inner West to Sydney CBD will also be $75.
If you edit a reciprocal rate later, both directions update automatically.
Leave it unticked if pricing differs by direction.
Multiple Services
You can add multiple services to one rate (e.g. "Movement" + "Tolls"). When creating bookings later, each service will be applied to each vehicle moving between these zones. The total shows at the bottom of the form.
CSV Import
CSV import is faster for adding many rates at once. You work in a spreadsheet, then upload the file.
Step 1: Export a Template
- Go to Data > Rates
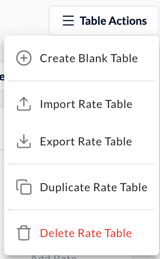
- Click Table Actions (top right)
- Select Export Rate Table
- Save the CSV file
This creates a template with the correct column structure. If you don't have any rates yet, the file will only contain headers.
Step 2: Add Your Rates
Open the CSV file in Excel, Google Sheets, or any spreadsheet program.
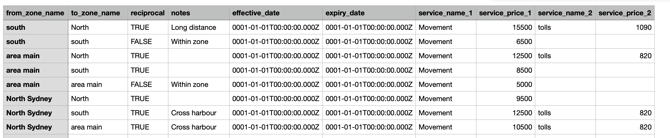
Columns to include:
from_zone_name- Starting zone (must match exact zone name)to_zone_name- Destination zone (must match exact zone name)reciprocal- Set totruefor reciprocal rates,falseotherwisenotes- Any notes about the rateeffective_date/expiry_date- Leave as default datesservice_name_1- First service nameservice_price_1- First service price in cents (e.g. 7500 for $75)service_name_2/service_price_2- Second service (if needed)- add more services name / price columns if needed
Important:
- Zone names must match exactly (including capitals and spaces)
- Prices are in cents: $75.00 = 7500
- Keep all column headers intact
Step 3: Import the File
- Save your changes to the CSV file
- Go to Data > Rates
- Click Table Actions
- Select Import Rate Table
- Choose your CSV file
- Review the preview showing new rates (green) and any errors (red)
- Click Import [X] Valid Rates
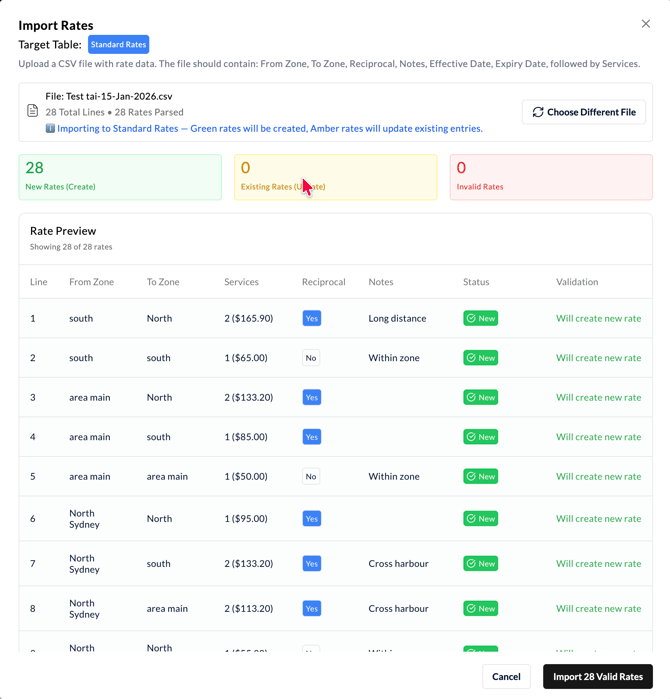
The system validates the file before importing. Green rates will be created, amber rates will update existing entries, and red rates show errors that need fixing.
Filter and View Rates
Use filters to focus on specific routes:
- Click Filter Zones
- Select zones in From Zones or To Zones
- The table updates to show only matching rates
Clear filters by clicking the × next to zone names.
Edit or Delete Rates
Edit a rate: Click the rate amount in the table, update the details, then save. If the rate is reciprocal, both directions update automatically.
Delete a single rate: Click the rate, then click Delete
Delete all rates in a table:
- Click Table Actions > Delete Rate Table
- Export the table first (mandatory safety step)
- Type the exact table name to confirm
- Click Delete
Rate Table Names
Each rate table needs a name. Use the dropdown at the top of the screen to switch between tables if you have multiple pricing structures.
What's Next
Once your rates are set up, they'll be available when creating bookings and quotes. The system will automatically pull the correct rate based on the zones. This feature is under development at the moment and will be available soon.
For now, focus on getting your rates into the system. You can always update them later.